Introduction
In the dynamic world of cloud-native development, keeping tabs on your applications and infrastructure is crucial. With ever-shifting deployments and scaling infrastructure, traditional monitoring tools often fall short. Luckily, Python comes to the rescue!
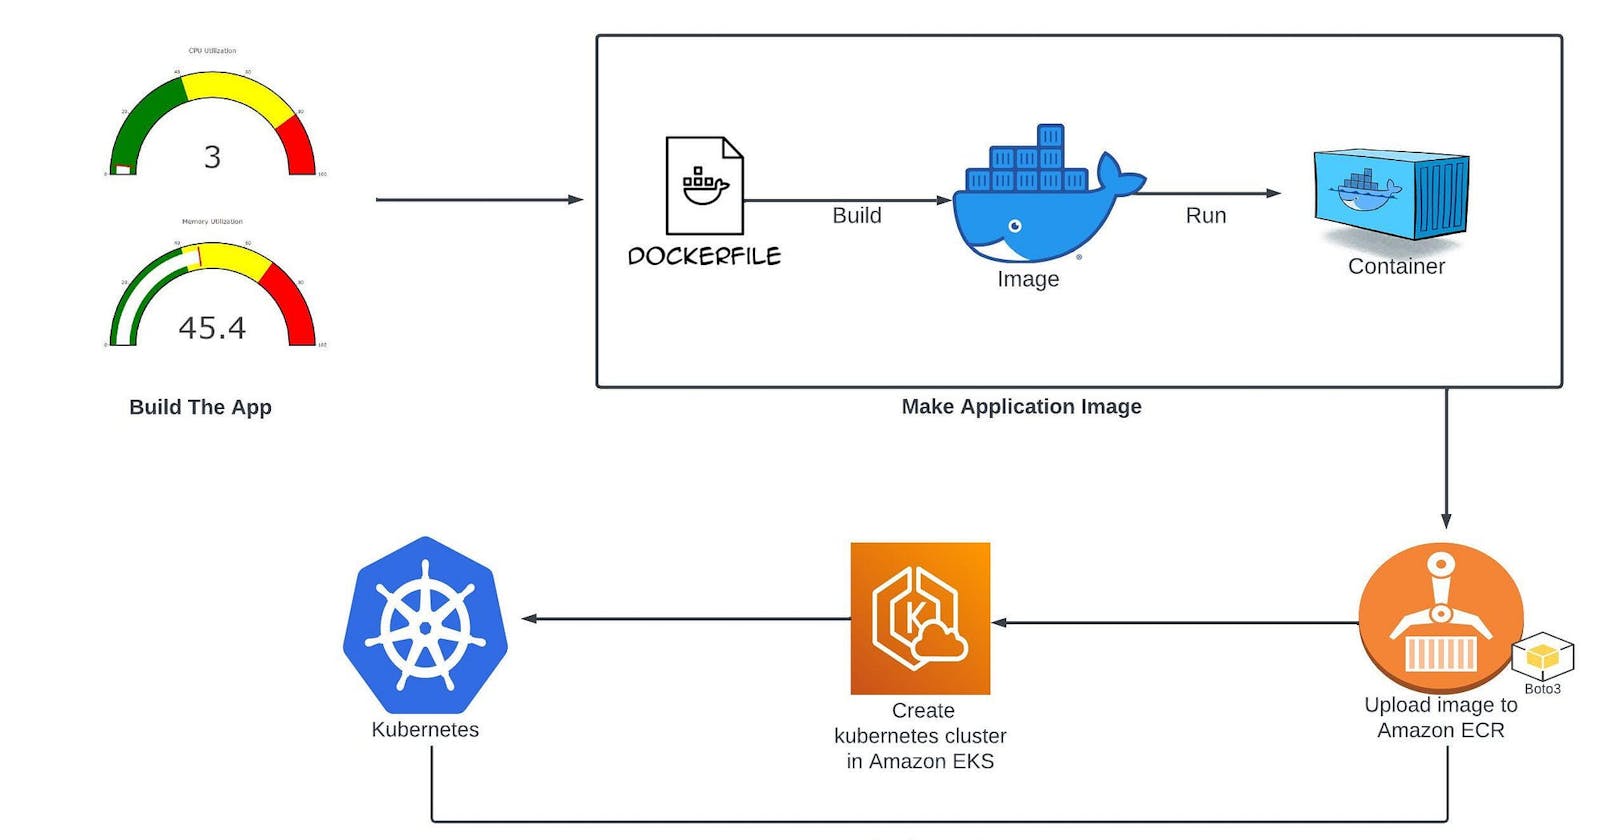
This article delves into crafting a cloud-native monitoring application using the power of Python. We'll explore the key considerations, architecture options, and libraries that equip you to build a robust and insightful monitoring solution.
Why Python?
Python's ease of use, extensive libraries, and integration with cloud platforms make it a perfect choice for cloud-native development. Libraries like psutil, boto3, and kubernetes grant access to system resources, cloud services, and containerized environments, empowering you to capture granular metrics.
Writing the application
Create the directory Cloud-native-app and within that directory make app.py file and use below code.
import psutil
from flask import Flask, render_template

app = Flask(__name__)

@app.route("/")
def index():
    cpu_metric = psutil.cpu_percent()
    mem_metric = psutil.virtual_memory().percent
    Message = None
    if cpu_metric > 80 or mem_metric > 80:
        Message = "High CPU or Memory Detected, scale up!!!"
    return render_template("index.html", cpu_metric=cpu_metric, mem_metric=mem_metric, message=Message)

if __name__=='__main__':
    app.run(debug=True, host = '0.0.0.0')
Create the index folder within the same directory and use the below code in index.html file
<!DOCTYPE html>
<html>
<head>
<title>System Monitoring</title>
<script src="https://cdn.plot.ly/plotly-latest.min.js"></script>
<style>
.plotly-graph-div {
margin: auto;
width: 50%;
background-color: rgba(151, 128, 128, 0.688);
padding: 20px;
}
</style>
</head>
<body>
<div class="container">
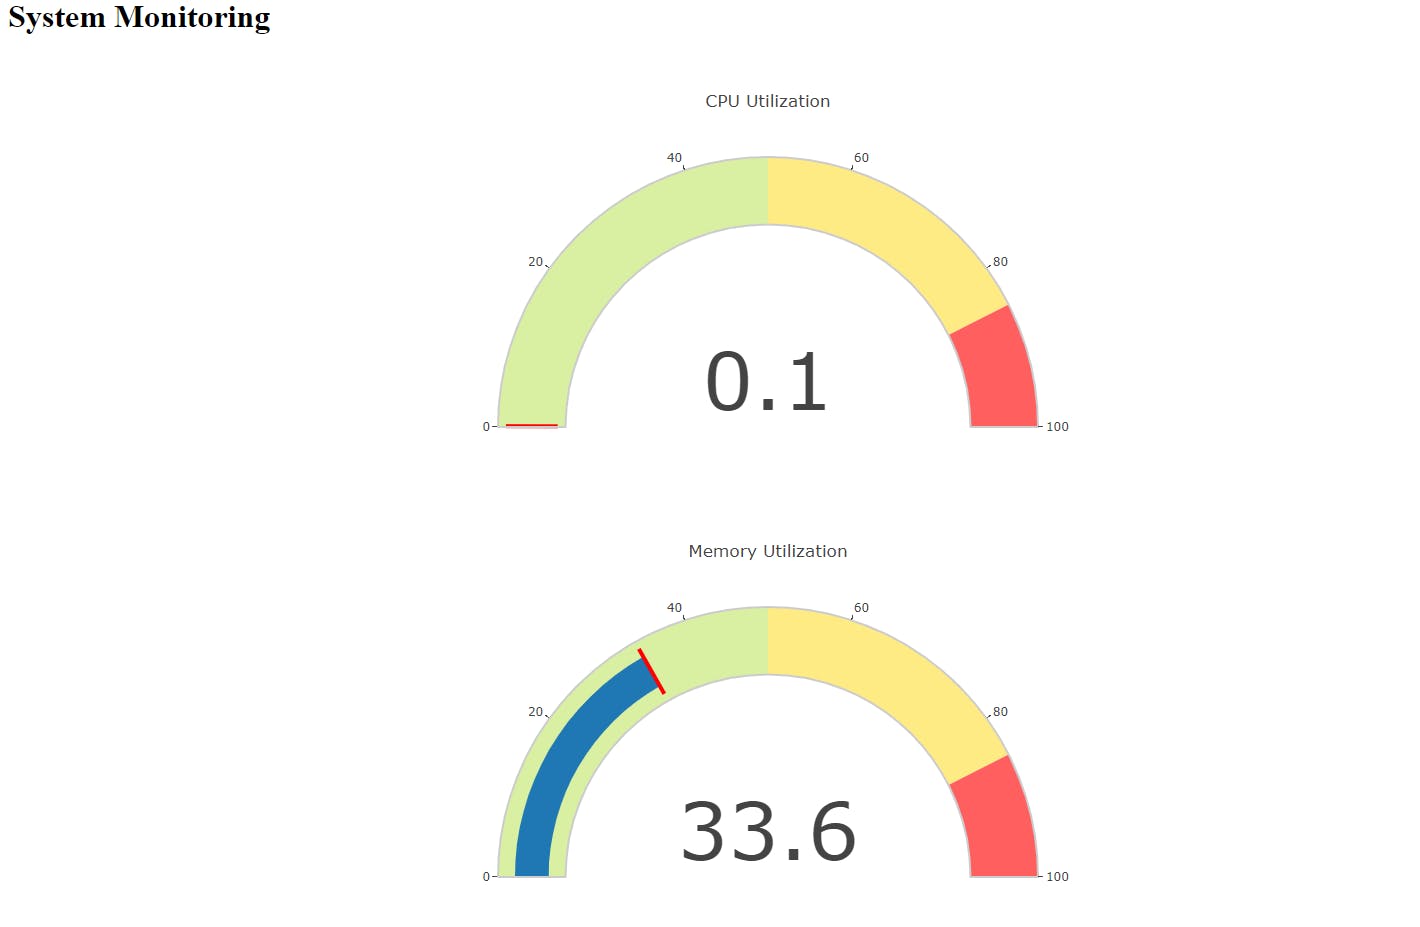
<h1>System Monitoring</h1>
<div id="cpu-gauge"></div>
<div id="mem-gauge"></div>
{% if message %}
<div class="alert alert-danger">{{ message }}</div>
{% endif %}
</div>
<script>
var cpuGauge = {
type: "indicator",
mode: "gauge+number",
value: {{ cpu_metric }},
gauge: {
axis: { range: [null, 100] },
bar: { color: "#1f77b4" },
bgcolor: "white",
borderwidth: 2,
bordercolor: "#ccc",
steps: [ { range: [0, 50], color: "#d9f0a3" },
{ range: [50, 85], color: "#ffeb84" },
{ range: [85, 100], color: "#ff5f5f" }
],
threshold: {
line: { color: "red", width: 4 },
thickness: 0.75,
value: {{ cpu_metric }}
}
}
};
var memGauge = {
type: "indicator",
mode: "gauge+number",
value: {{ mem_metric }},
gauge: {
axis: { range: [null, 100] },
bar: { color: "#1f77b4" },
bgcolor: "white",
borderwidth: 2,
bordercolor: "#ccc",
steps: [ { range: [0, 50], color: "#d9f0a3" },
{ range: [50, 85], color: "#ffeb84" },
{ range: [85, 100], color: "#ff5f5f" }
],
threshold: {
line: { color: "red", width: 4 },
thickness: 0.75,
value: {{ mem_metric }}
}
}
};
var cpuGaugeLayout = { title: "CPU Utilization" };
var memGaugeLayout = { title: "Memory Utilization" };
Plotly.newPlot('cpu-gauge', [cpuGauge], cpuGaugeLayout);
Plotly.newPlot('mem-gauge', [memGauge], memGaugeLayout);
</script>
</body>
</html>
Creating the Dockerfile :
Now, create the docker using vi Dockerfile
FROM python:3.9-slim-buster

WORKDIR /app

COPY Requirement.txt .

RUN pip3 install --no-cache-dir -r Requirement.txt

COPY . .

ENV FLASK_RUN_HOST=0.0.0.0

CMD ["flask", "run"]
To run this application we need following package . So, create Requirement.txt file and use below package.
Flask==2.2.3
MarkupSafe==2.1.2
Werkzeug==2.2.3
itsdangerous==2.1.2
psutil==5.8.0
plotly==5.5.0
tenacity==8.0.1
boto3==1.9.148
kubernetes==10.0.1
Creating ECR using boto3 module
Create ecr.py file and use below code in that file
import boto3

client = boto3.client('ecr')
response = client.create_repository(
    repositoryName='my_app_registry'
)
print(response['repository']['registryId'])
Docker Image creation and Pushing to ECR
To create Docker image run below command
docker build -t <image-name> .
# you can give <image-name> on your own choice
To push the image in ECR you can checkout my blog
How to push image into Amazon ECR
Creating EKS cluster with EKSCTL
Before creating EKS Cluster following criteria should meet:
AWS clishould be installed and configuredEKSCTLshould be installedInstall the kubernetes client(
pip install kubernetes)Install
kubectl
Create the Cluster.yaml file
apiVersion: eksctl.io/v1alpha5
kind: ClusterConfig

metadata:
  name: cloud-native-app
  region: us-east-1

nodeGroups:
  - name: ng-1
    instanceType: t2.micro
    desiredCapacity: 1
  - name: ng-2
    instanceType: t2.micro
    desiredCapacity: 1
Now , Run the below command to create cluster
eksctl create cluster -f Cluster.yaml
Now, it starts creating cluster and takes near around 10 to 20 minutes to complete and once it created then you are able to access your cluster.
Creating Deployment and service using python
Create one eks.py file and use this code in that file.
Note: Use you own <Image-ARN> while creating deployment
#create deployment and service
from kubernetes import client, config

# Load Kubernetes configuration
config.load_kube_config()

# Create a Kubernetes API client
api_client = client.ApiClient()

# Define the deployment
deployment = client.V1Deployment(
    metadata=client.V1ObjectMeta(name="my-flask-app"),
    spec=client.V1DeploymentSpec(
        replicas=1,
        selector=client.V1LabelSelector(
            match_labels={"app": "my-flask-app"}
        ),
        template=client.V1PodTemplateSpec(
            metadata=client.V1ObjectMeta(
                labels={"app": "my-flask-app"}
            ),
            spec=client.V1PodSpec(
                containers=[
                    client.V1Container(
                        name="my-flask-container",
                        image="<your iamge ARN >",
                        ports=[client.V1ContainerPort(container_port=5000)]
                    )
                ]
            )
        )
    )
)

# Create the deployment
api_instance = client.AppsV1Api(api_client)
api_instance.create_namespaced_deployment(
    namespace="default",
    body=deployment
)

# Define the service
service = client.V1Service(
    metadata=client.V1ObjectMeta(name="my-flask-service"),
    spec=client.V1ServiceSpec(
        selector={"app": "my-flask-app"},
        ports=[client.V1ServicePort(port=5000)]
    )
)

# Create the service
api_instance = client.CoreV1Api(api_client)
api_instance.create_namespaced_service(
    namespace="default",
    body=service
)
Now , Run pip3 eks.py which interact with AWS API and create the Deployment and Service in your EKS Cluster.
Accessing the Application
Run kubectl port-forward svc/my-flask-service 5000:5000
Now, you are able to access your application on your localhost:5000